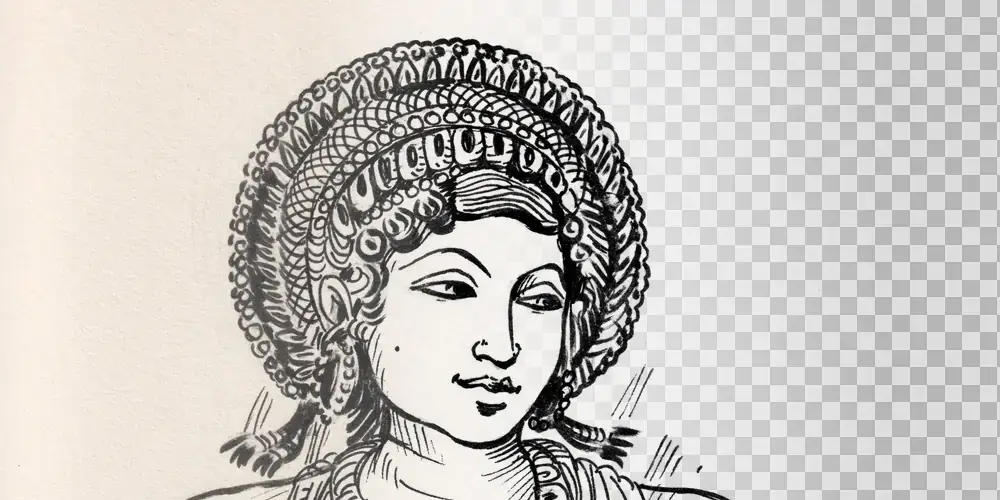
Hello Everyone 🙏🏼,
I noticed that there are comparatively fewer Krita tutorials in written format on the internet. So I am going to start writing tutorials for some basic things that artists would need to do in Krita. We sketch on paper and then we scan the sketch and work on them digitally. Or you might be a traditional artist migrating to digital workflow; you might need your scanned art in Krita to further work on it.
Separating the line art on a transparent layer is one of the most needed steps and this is the first step you do when you transfer the sketch from paper to screen. We will learn to remove the white background and keep only the clean lines so that we can color underneath it. There are three methods that I have listed here, if you need the quickest way, just jump to Method 1. Otherwise, let us get started.
Before scanning your art
One of the things to keep in mind is if the input is of good quality, we get good quality output. So depending on the type of artwork you want, you should choose your paper to draw the artwork and scan settings properly. If you need clean crisp lines, choose a white paper and a paper which will not bleed ink. Handmade cartridges will have yellow tint and will also bleed the ink a bit, so your line art will not be very clean. Unless you want that specific rough look, choose a good quality white paper.
While scanning the artwork, scan at minimum 450 DPI. I would recommend you scan at 600DPI since you would get a large image, which you can scale down later. I would recommend using a flatbed scanner to scan your artworks instead of taking photos with a mobile phone, because if there is shadow or lighting condition is not good in the photo, it will be a hassle to clean up.
Once you have your artwork scanned, load it in Krita by importing it as a layer by choosing Layer Menu -> Import/Export -> Import layer or just drag and drop the scanned image in your file. Save it as a .kra file and start your cleaning work.
Preparing your line art
We will need to first clean up and prepare the image. If you have used a cartridge paper with yellow tint like I have used here, then you would need to convert it to black and white first. I will also clean up some left over pencil art that I forgot to erase before scanning.
To convert your artwork to black and white -
- Go to Filter Menu -> Adjust -> Desaturate or press Ctrl + Shift + U. This will bring up the dialog box that you see in the screenshot below
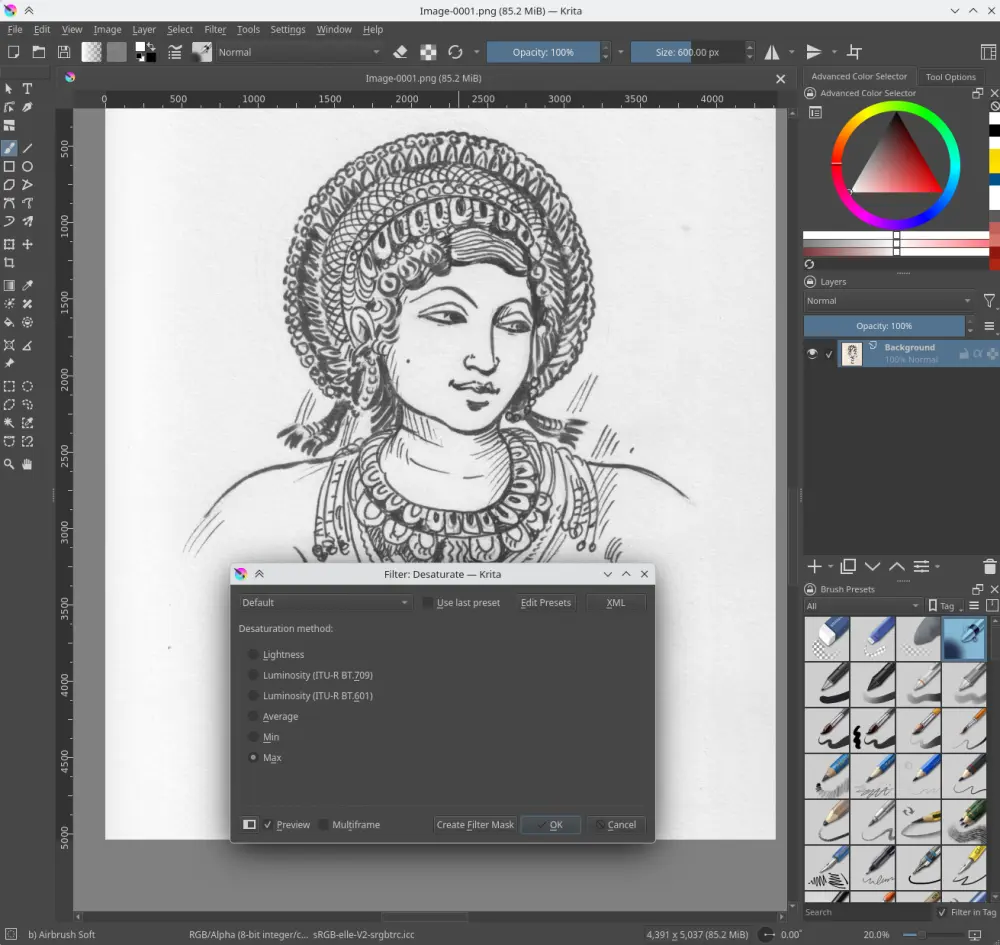
Choose the Max option and click okay. Max gives slightly brighter result since it adds all the RGB values to get the resulting gray. Having the brighter white will help us.
- Now we will further enhance the black and whites in the image and remove gray as much as possible. To do this go to Filter Menu -> Adjust -> Levels or press Ctrl + L. This will bring up the dialog box shown below.
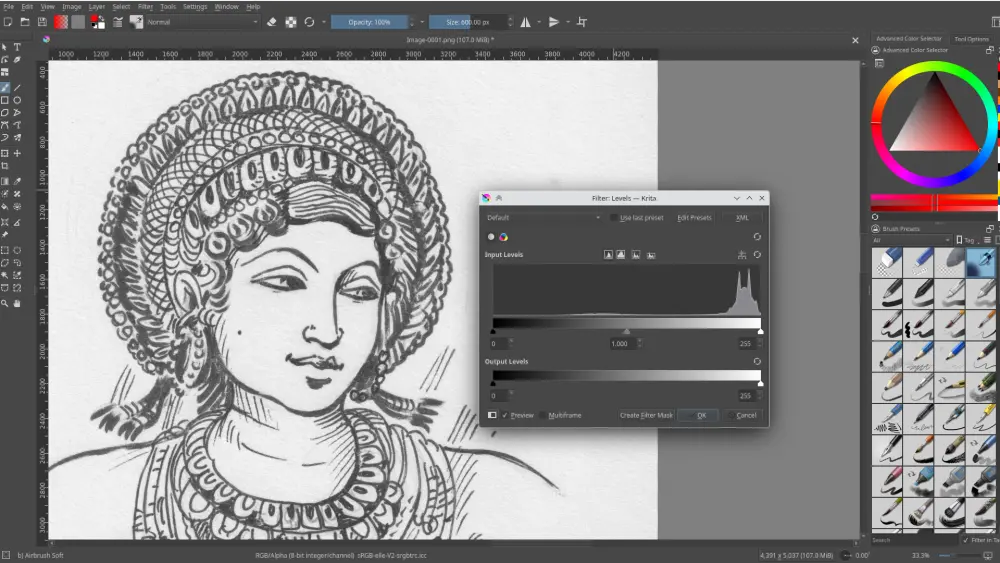
Adjust the values by using the triangular button sliders like I am doing on the video below.
The exact values for these will depend on your scanned image. Try to make the blacks as dark as possible and the whites as white as possible. Zoom in and check the line art; if the line thickness is changing, adjust the values accordingly.
The crispness of the lines depends on the type of inking you have done. If your style is clean and not rough, or if the paper you used is good quality that does not bleed, then you will get clear smooth lines. Here my paper was cartridge and I wanted the lines to be a bit rough.
Method 1 - Color to Alpha (the easiest way)
Once you have your line art cleaned up, we remove the white color. This is the easiest method to remove white background (or any other flat color from your image) and it is just two or three clicks. This method will work most of the time, but if you are working on a comic project which requires very crisp solid black lines, then we have another method which I will show you in the next section.
- Select your imported layer or layer that has your scanned image.
- Go to Filter Menu -> Colors -> Color To Alpha
Choose the eye dropper tool to select the color of your background if it is other than white. Here we can choose white directly from the color wheel. Krita will turn the white pixels in the layer to transparent pixels.
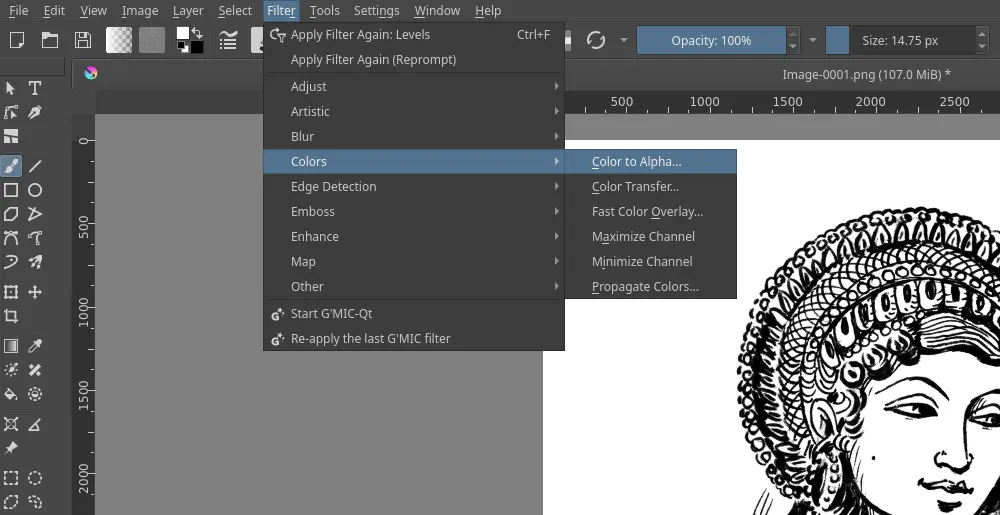
That is it, done. You now have your line art on a separate layer without the white background.
Method 2 - Select from Color Range
This method is somewhat similar to the previous one, but here we are doing the work of manually removing the white or masking it. You can get clean lines without anti-aliasing. We continue from the beginning where we have adjusted the levels of the scanned image and cleaned it up.
- Now with the layer in which your artwork is selected, go to Select Menu -> Select From Color Range. It will open the dialog box shown below in the screenshot. Choose Highlights from the dropdown and then press the Select button. If you feel that the selection is not good and does not cover the line art properly, then press the Deselect button and adjust the Fuzziness value through the slider; the default value of 100 should work most of the time.
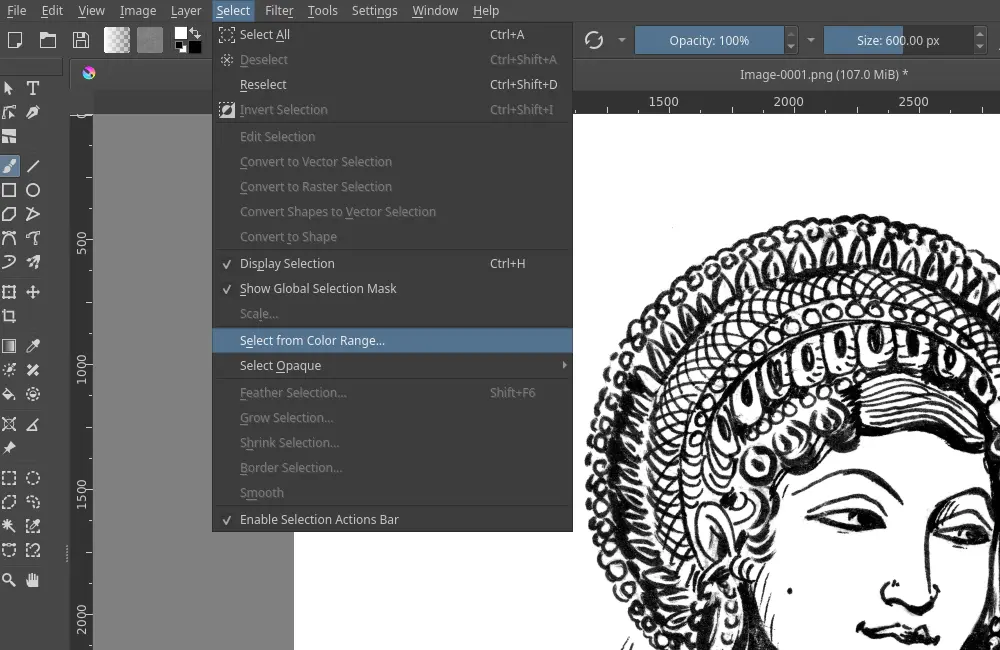
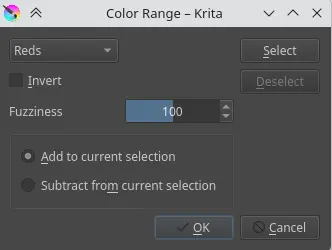
Now invert the selection by going to Select Menu -> Invert Selection or pressing Ctrl + Shift + I on your keyboard.
This selection will be non anti-aliased, as in the edges of the line art will be completely black when filled. If you want it to be a bit smoother or want it anti-aliased, then you can Feather Selection. Go to Select Menu -> Feather Selection or press Shift + F6. Add 1px in the feather radius input box and press okay. If you do not want it smoother, then skip this step.
Now create a new empty layer by pressing the plus button on the layer docker. Or press the Insert Key on your keyboard.
Right-click on the newly created layer and then go to Add -> Add Transparency mask, now select the layer and fill it with any color or black. If you need colored lines, you can paint on this layer.
Hide the initial scanned image layer or delete it.
Method 3 - Cross Channel Adjustment Curves
At the core all three methods are somewhat similar. They take the lightness or highlight from the image and replace it with transparency. These are just multiple ways to achieve the same outcome. These last two methods would give you crisper lines.
- After using levels filter and cleaning up the scanned image, go to Filter Menu -> Adjust -> Cross Channel Adjustment Curves
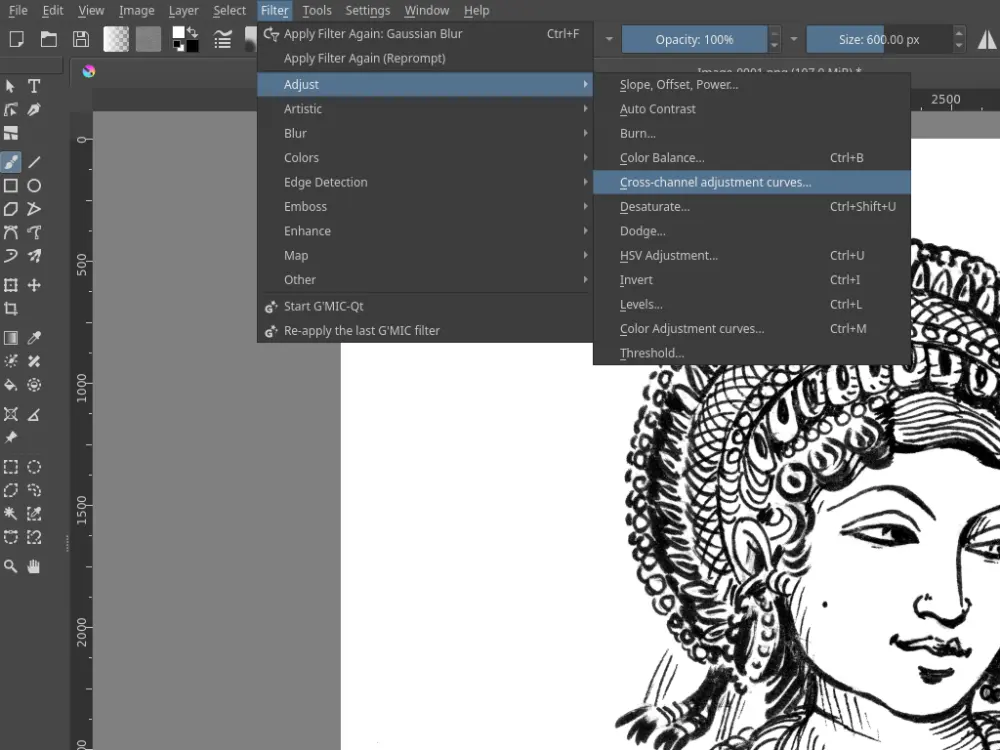
In the dialog box, select Channel as Alpha from the dropdown (it will have saturation by default); the driver channel will be lightness, let us keep it that way. This will make the lightness map to alpha, that is, transparency.
Now in the curves select the rightmost node and bring it all the way to the bottom. Add a node in the middle and shift it up. Hold Ctrl and click on the new node to make it straight. Bring the rightmost node below this new node as shown in the screenshot here. Adjust the value as per your image, you can zoom in and check the results.
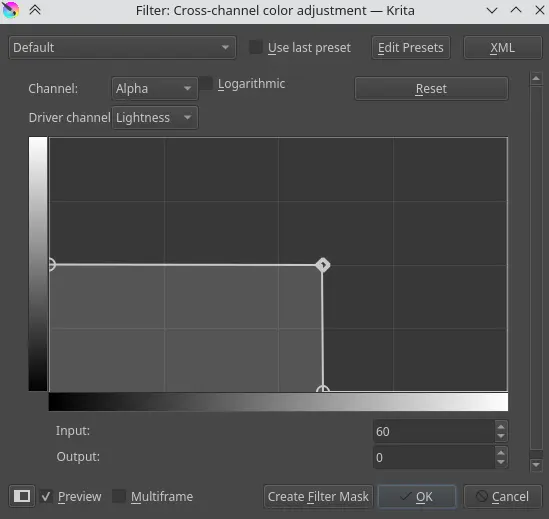
Now set the blend mode of this layer to Multiply and you are ready to work.
You can also remove anti-aliasing by applying a threshold filter over this.
Of these three methods you can use the first one if you are in a hurry or if the line art does’t need to be crisp. The masking method will be of help when you are working on comics and you need to add color holds. Color holds are basically areas where you want the line art to be in different color other than black. We will explore color holds in future tutorials.
So that is it. You will have your line art on a separate layer with transparency. You can go on and add colors to it. I also have a tutorial on quickly adding flat colors check it out. See you again in the next tutorial.
Bonus Tip
If you use the filters like Color to Alpha and Cross Channel Adjustment, then you can add these filters non-destructively on the scanned image layer so that if the artwork is changed later, you can just copy-paste these filters on the new layer. Or better, you can add the line art as file layers.
Comments
Do you have any feedback or comment on this post?Send a toot to me on fediverse or email me your feedback.